How to Overlay Property Lines on Drone Photos: A Complete Guide for Real Estate Professionals
Table of Contents
- What is Property Line Overlay?
- Why Overlay Property Lines on Drone Photos?
- Finding Property Line Data
- Capturing Drone Photos for Property Overlays
- Software Options for Overlaying Property Lines
- Step-by-Step Process Using Free Tools
- Legal Disclaimer Requirements
- Alternative Approaches
Drone photography has become an essential marketing tool for real estate professionals, but adding property lines to aerial photos takes listings to another level. When buyers can see exactly where the property boundaries lie from an aerial view, it eliminates confusion and builds confidence—especially for larger lots, wooded properties, or irregular parcels.
I've worked with dozens of realtors who say property line overlays are one of their most requested features for land and rural listings. The process involves some GIS (Geographic Information System) work, but once you understand the workflow, you can produce these images in under 30 minutes.
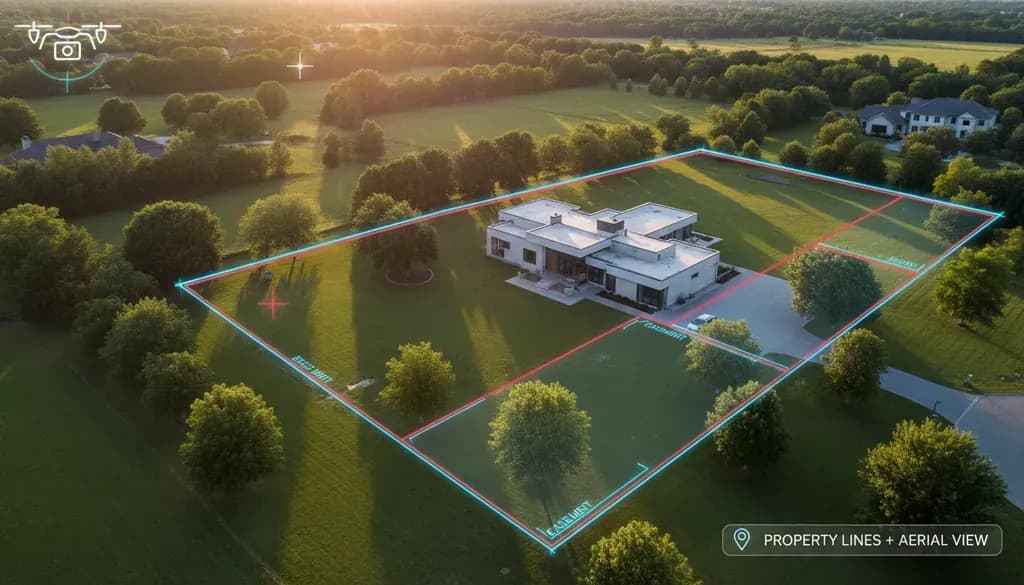
[Image: Before and after comparison showing a drone aerial photo of a wooded property, then the same photo with yellow property boundary lines overlaid]
What is Property Line Overlay?
Property line overlay is the process of adding parcel boundary data onto aerial photographs, creating a visual representation of where one property ends and another begins. The lines are typically drawn in bright colors (yellow, red, or white) so they stand out clearly against the landscape.
These overlays are not legal surveys—they're visual approximations based on county GIS data. Think of them as helpful marketing tools rather than definitive boundary markers.
Why Overlay Property Lines on Drone Photos?
Property line overlays serve several practical purposes:
- Buyer clarity: Potential buyers immediately understand the property's footprint, especially important for large or irregular lots
- Marketing differentiation: Listings with property line overlays stand out on MLS platforms and social media
- Reduced confusion: Eliminates questions like "Does the property include the pond?" or "How far back does it go?"
- Faster sales: According to Zillow research, listings with accurate aerial visuals can sell 68% faster than those without
The process is particularly valuable for vacant land, farms, estates, and properties with acreage where boundaries aren't obvious from ground-level photos.
Finding Property Line Data
Before you can overlay anything, you need the actual property boundary data. Here's where to find it:
County GIS Databases
Most counties in the United States maintain online GIS systems with parcel data available to the public. These databases typically include:
- Property boundary shapefiles
- Parcel numbers and addresses
- Ownership information
- Tax assessment data
To find your county's GIS system, search for "[County Name] GIS" or "[County Name] parcel viewer." Many counties provide free downloads of parcel data in formats like Shapefile, KML, or GeoJSON.
Important accuracy note: County GIS data is compiled for tax assessment purposes, not boundary determination. According to Kentucky's LINK-GIS consortium, property lines in newer subdivisions (past 15 years) are generally accurate within 5 feet, while older rural parcels may have been mapped based on fence lines or assumed boundaries and could be off by significantly more.
Commercial Parcel Data Services
If you work across multiple counties or need standardized data, commercial services can save time:
- Regrid: Parcel data covering the entire US, standardized format, integrates with ArcGIS
- DataTree by First American: Property data platform with API access
- County-specific vendors: Many counties contract with third-party providers who sell enhanced datasets
These services typically cost $30-200 per county or offer subscription models for high-volume users.
State-Level Resources
Some states maintain centralized parcel databases. Texas, for example, offers free statewide parcel data through the Texas Geographic Information Office.
[Image: Screenshot showing a typical county parcel viewer interface with property boundaries visible]
Capturing Drone Photos for Property Overlays
The quality of your drone photo directly affects how professional the final overlay looks. Here are specific considerations:
Flight Planning
- Altitude: Fly high enough to capture the entire property in frame. For most residential lots, 200-300 feet works well. Larger properties may require 350-400 feet (the legal maximum without a waiver is 400 feet AGL).
- Angle: Shoot straight down (nadir angle). Oblique angles distort the image and make accurate overlay alignment nearly impossible. Most drones have a gimbal that can point straight down—use it.
- Landmarks: Include visible reference points like roads, buildings, driveways, or fence corners. These landmarks are crucial for the georeferencing step.
- Image format: Shoot in RAW if possible for maximum editing flexibility. Make sure GPS data is embedded in the image EXIF data (most modern drones do this automatically).
Drone Accuracy Considerations
Consumer drones use GPS for positioning, but that GPS is only accurate to about 2-5 meters (6-15 feet) according to Maps Made Easy. This is acceptable for marketing overlays but reinforces why these should never be represented as surveys.
For survey-grade accuracy (1-3 cm), you'd need RTK/PPK-equipped drones and ground control points—overkill for marketing purposes but essential if you're working with surveyors or engineers.
Software Options for Overlaying Property Lines
You have several software choices depending on your budget and technical comfort level:
Free Options
QGIS (recommended for beginners)
- Open-source GIS software
- Handles shapefiles, KML, and other GIS formats
- Built-in georeferencing tools
- Learning curve: moderate
- Cost: Free
- Download: qgis.org
Google Earth Pro
- User-friendly interface
- Limited editing capabilities
- Good for simple overlays
- Cost: Free
Paid Options
ArcGIS Online/Pro
- Industry standard for GIS professionals
- Powerful georeferencing and overlay tools
- Steep learning curve
- Cost: $100+/year for basic subscriptions
Adobe Photoshop
- If you already have Photoshop, you can manually draw property lines using the Polygon Tool
- Requires manual alignment with no GIS assistance
- Works for simple rectangular lots
- Cost: $20-55/month
Quick Mobile Solutions
For simple rectangular properties, some professionals use basic image editors:
- Apple Photos Markup (iOS): Free, very limited
- Snagit: $50, simple annotation tools
- Preview (Mac): Free markup toolbar
These won't handle georeferencing or complex parcel shapes but can work for basic visualization.
Step-by-Step Process Using Free Tools
Here's the practical workflow using QGIS, which balances capability with accessibility:
Step 1: Install QGIS and Gather Your Data
- Download and install QGIS from qgis.org
- Obtain your parcel data from the county (Shapefile or KML format)
- Have your geotagged drone photo ready (JPEG or TIFF)
Step 2: Import the Drone Photo
- Open QGIS and create a new project
- Go to Layer > Add Layer > Add Raster Layer
- Select your drone photo
- If the image has embedded GPS coordinates (check EXIF data), QGIS may position it automatically. If not, you'll need to georeference it manually
Step 3: Georeference the Drone Photo
Georeferencing aligns your drone photo with real-world coordinates. This is the most technical step:
- Go to Raster > Georeferencer
- Add your drone image
- Add a reference layer (like Google Satellite imagery via XYZ Tiles) or use your parcel data as reference
- Add Ground Control Points (GCPs): Click on identifiable features in your drone image (road intersections, building corners), then click the corresponding location on the reference layer
- Add at least 4-6 GCPs distributed across the image for best results
- Set transformation type to "Polynomial 1" for most situations
- Click Start Georeferencing
The georeferenced image will now align with real-world coordinates.
Step 4: Import Parcel Data
- Go to Layer > Add Layer > Add Vector Layer
- Select your parcel shapefile or KML
- The property boundaries should appear on the map
- Use the Identify Features tool to find your specific parcel
Step 5: Style the Property Lines
- Right-click the parcel layer > Properties > Symbology
- Change to Categorized or Rule-based styling if you want to highlight just one parcel
- Set line color to bright yellow or white (3-5 pixel width)
- Set fill to transparent or semi-transparent
- Add a black outline (1-2 pixels) outside the main line for contrast
Step 6: Export the Final Image
- Zoom to your property and frame it how you want
- Go to Project > Import/Export > Export Map to Image
- Set resolution to at least 300 DPI for print quality
- Save as high-quality JPEG or PNG
For detailed georeferencing instructions specific to QGIS, Geospatial Training Services offers additional tutorials.
[Image: Diagram showing the workflow from drone photo + parcel data through QGIS to final overlaid image]
Legal Disclaimer Requirements
This is critical: Never represent your overlays as legal surveys or warranty their accuracy.
According to discussions on professional drone forums, the standard approach is to include a clear disclaimer on any image with property lines. Here's recommended language:
> "Property lines shown are approximate and for illustrative purposes only. They are not a legal survey and should not be used to determine actual property boundaries. Contact a licensed land surveyor for exact boundary determination."
Why this matters:
- Municipal GIS data is typically compiled for tax purposes, not legal boundary determination
- Property lines in GIS systems can be off by several feet or more
- Only licensed surveyors can definitively establish legal boundaries
- Misrepresenting boundaries could create legal liability
Some states have specific regulations about who can mark property boundaries. When in doubt, use language like "estimated boundaries" or "approximate parcel location."
Alternative Approaches
If the GIS workflow seems too complex, consider these alternatives:
Hire a Drone Service
Many professional drone operators offer property line overlays as an add-on service. Expect to pay $50-150 extra per property depending on complexity. Search for "drone real estate photography [your city]" and ask if they provide boundary overlays.
Use Property Survey Documents
If the property owner has a recent survey, you can:
- Scan the survey plat
- Use Photoshop to overlay it on the drone photo
- Adjust opacity and align visible landmarks
- This approach is less accurate but faster for simple rectangular lots
Partner with a GIS Professional
For agents who regularly market large properties or land, developing a relationship with a local GIS consultant can be cost-effective. Many charge $25-75 per overlay once they have the workflow established.
Virtual Staging Integration
If you're already using virtual staging services for interior photos, some companies are expanding to offer property line overlays. While AI-powered virtual staging tools currently focus on interior design, the trend toward integrated aerial services is growing. At $5 per photo for virtual staging, comparable pricing for automated property line overlays may emerge as the technology matures.
Tips from Professional Users
Based on real estate photographer forums and professional drone operators:
- Start with simple properties: Practice on rectangular suburban lots before attempting irregular rural parcels
- Keep a reference file: Once you've processed one property in a subdivision, you can reuse the parcel data for neighbors
- Batch processing: If you're doing multiple properties in the same county, download all parcel data at once
- Note your car's position: Park your white car in view as a reference point (tip from commercial photographers)
- Export multiple versions: Create one with property lines and one without—clients may want both
- Weekend county offices: Many county GIS offices are closed weekends, so download data during the week
Common Mistakes to Avoid
- Using oblique angles: Property lines only align properly with straight-down (nadir) shots
- Skipping georeferencing: Trying to manually align without proper GIS tools leads to inaccurate overlays
- Wrong coordinate system: Make sure your parcel data and imagery use the same coordinate reference system (typically WGS 84 / EPSG:4326)
- Over-promising accuracy: Always include disclaimers and never claim survey-level precision
- Ignoring client education: Explain to sellers/buyers that these are estimates to manage expectations
Property line overlays on drone photos provide real marketing value for real estate professionals, particularly for land, acreage, and properties where boundaries aren't immediately obvious. The workflow has a learning curve, but once mastered, you can produce professional overlays in 20-30 minutes per property.
The key is obtaining quality parcel data from county GIS systems, capturing properly framed drone imagery, and using appropriate GIS software for georeferencing and overlay. Most importantly, always include legal disclaimers stating that overlays are approximations, not surveys.
For agents who regularly market properties with acreage, mastering this skill—or partnering with someone who has—can be a significant competitive advantage in your market.